ภาพรวม (Overview)
")
แนะนำ (Introduction)
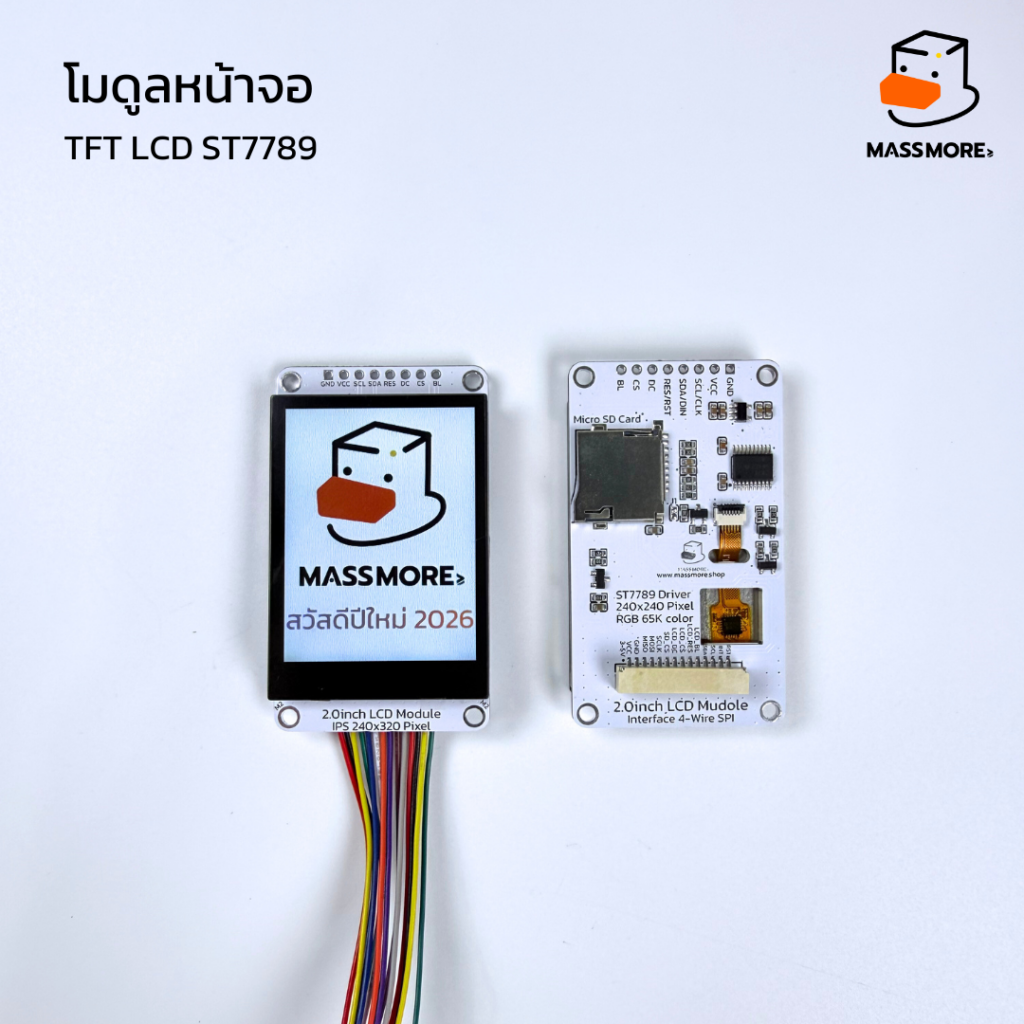
โมดูลหน้าจอแสดงผลซีรีส์ ST7789 จาก Massmore เป็นจอภาพชนิด IPS (In-Plane Switching) ที่ให้ความคมชัดสูง สีสันสดใส และมีมุมมองที่กว้างถึง 170 องศา เชื่อมต่อผ่านโปรโตคอล SPI ซึ่งใช้สายสัญญาณน้อย เหมาะสำหรับการใช้งานร่วมกับไมโครคอนโทรลเลอร์หลากหลายชนิด เช่น Arduino, ESP32, STM32 และ Raspberry Pi โดยมีให้เลือกใช้งานตั้งแต่ขนาดเล็กกะทัดรัดไปจนถึงขนาด 2.0 นิ้วที่รองรับการอ่านข้อมูลจาก SD card และระบบสัมผัสแม่นยำ เพื่อตอบโจทย์การสร้างสรรค์อุปกรณ์อัจฉริยะ (Smart Devices) และโปรเจกต์ IoT ในยุคปัจจุบัน
คุณสมบัติ (Features)
เทคโนโลยี IPS: ให้สีสันที่แม่นยำและมองเห็นได้ชัดเจนจากทุกมุมมอง
ไดรเวอร์ ST7789: เป็นมาตรฐานสากล รองรับไลบรารีการเขียนโปรแกรมที่หลากหลาย
ความละเอียดสูง: 240×240 และ 240×320 พิกเซล ให้ภาพที่เนียนละเอียด
การเชื่อมต่อ SPI: ใช้พินน้อย ประหยัดทรัพยากรของไมโครคอนโทรลเลอร์
ฟังก์ชันเสริม (รุ่น 2.0″): มาพร้อมช่องเสียบ Micro SD Card สำหรับจัดเก็บรูปภาพหรือข้อมูล
ระบบสัมผัส (รุ่น Touch): ใช้เทคโนโลยี Capacitive ผ่านชิป CST816 รองรับการตอบสนองที่รวดเร็วและลื่นไหล
ข้อมูลสินค้า (Spec Data)
ไดรเวอร์ไอซี (Driver IC) : ST7789 / ST7789V
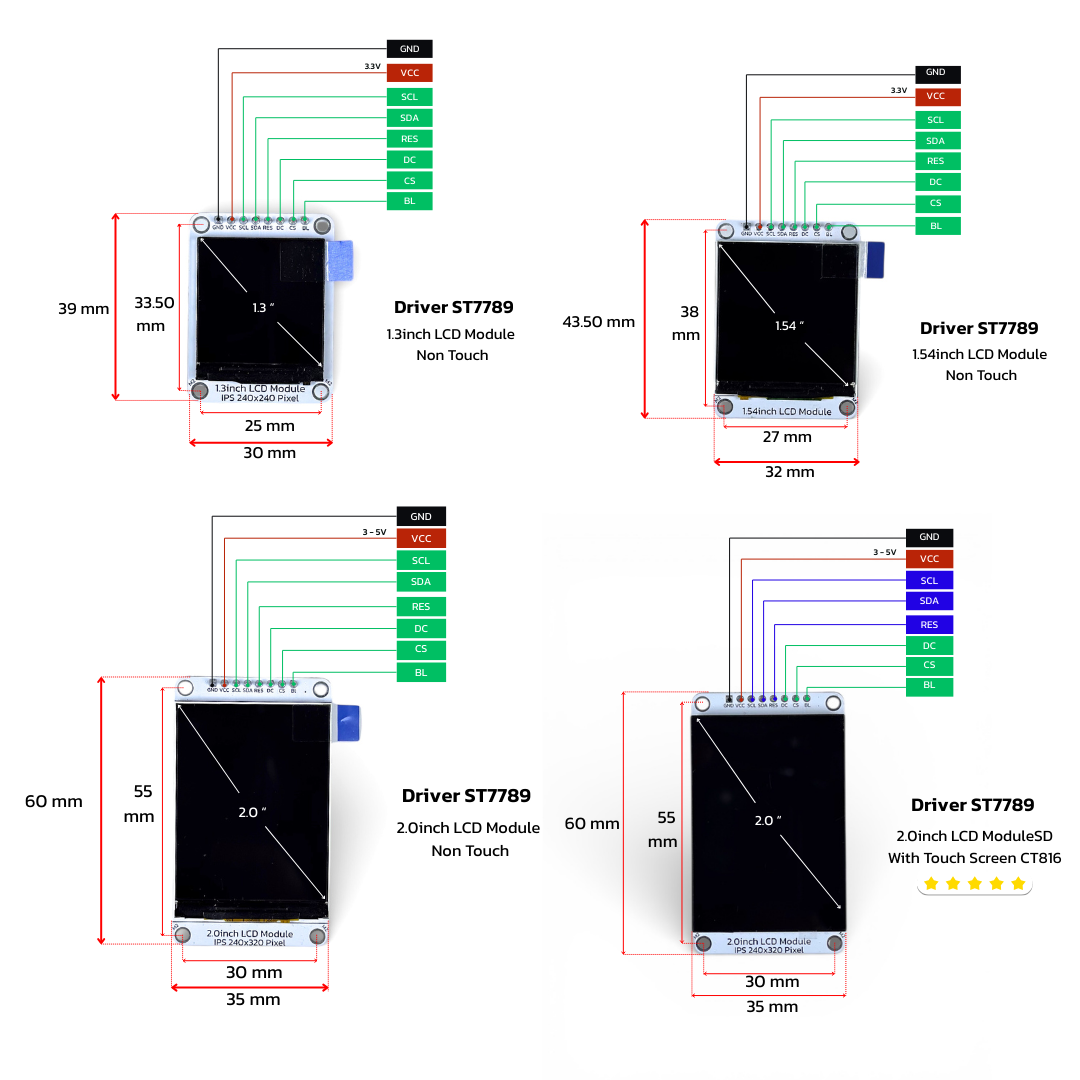
แรงดันไฟฟ้าใช้งาน (Operating Voltage) : 3.3V – 5.0VDC เฉพาะรุ่น 2.0 นิ้ว
แรงดันสัญญาณลอจิก (Logic Voltage) : 3.3V (แนะนำ)
การเชื่อมต่อ (Interface) : 4-Wire SPI
สีการแสดงผล (Color) : RGB 65K Color / 16-bit
ทิศทางการมอง: รอบด้าน (Full Viewing Angle)
ข้อมูลบอร์ด (Onboard Resources)
ข้อมูลขนาดสินค้า
ข้อมูลทางเทคนิค (Specification)
ขนาด 1.3 นิ้ว และ 1.54 นิ้ว
Resolution: 240 x 240 Pixels
Controller: ST7789V
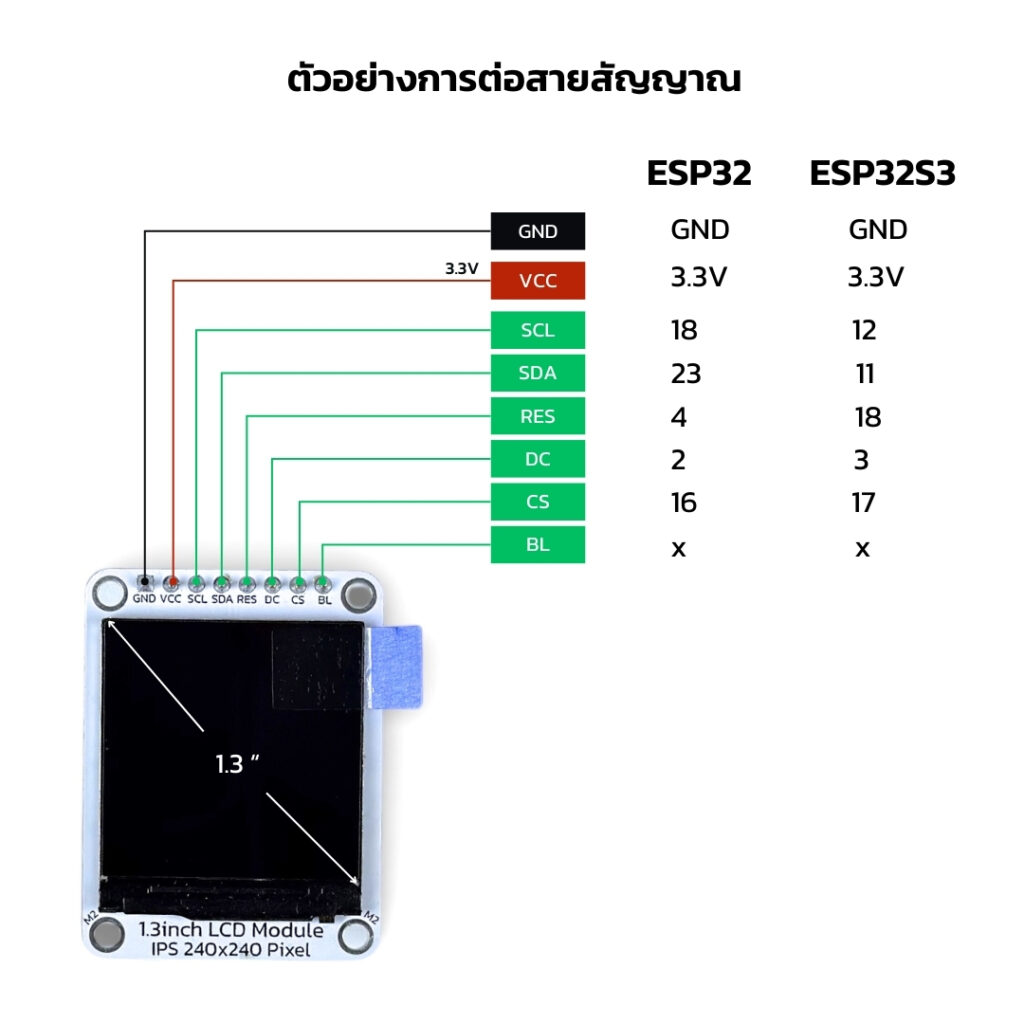
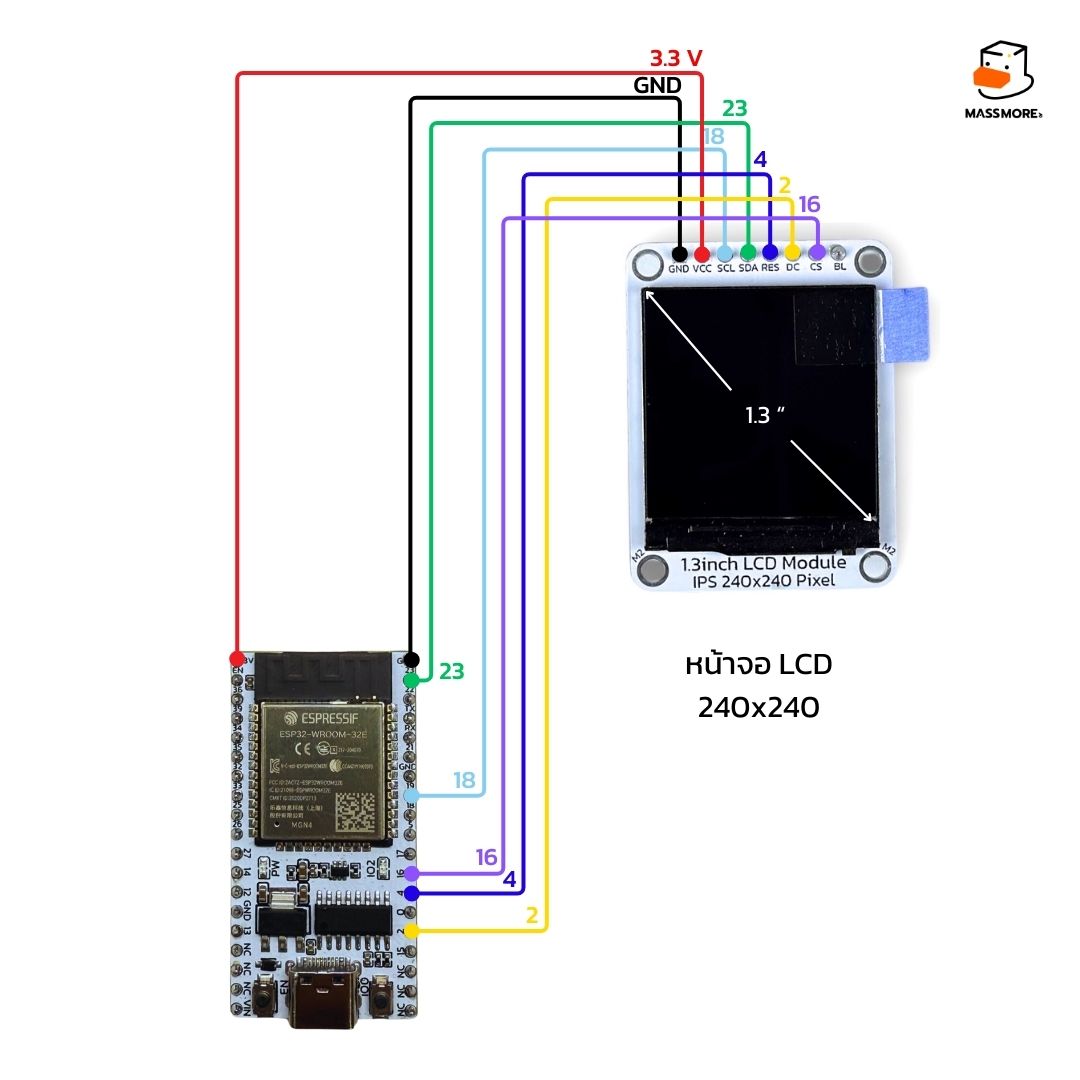
Interface: 7-Pin SPI (GND, VCC, SCL, SDA, RES, DC, BLK)
Active Area: 23.4 x 23.4 mm (1.3″) / 27.72 x 27.72 mm (1.54″)
ขนาด 2.0 นิ้ว (Non Touch / Touch)
Resolution: 240 x 320 Pixels
Controller: ST7789V
Touch Controller: CST816 (เฉพาะรุ่น Touch) เชื่อมต่อผ่าน I2C
Storage: Micro SD Card Slot เชื่อมต่อผ่าน SPI
Interface: Multi-pin Header (รองรับทั้งการแสดงผล, SD Card และ Touch)
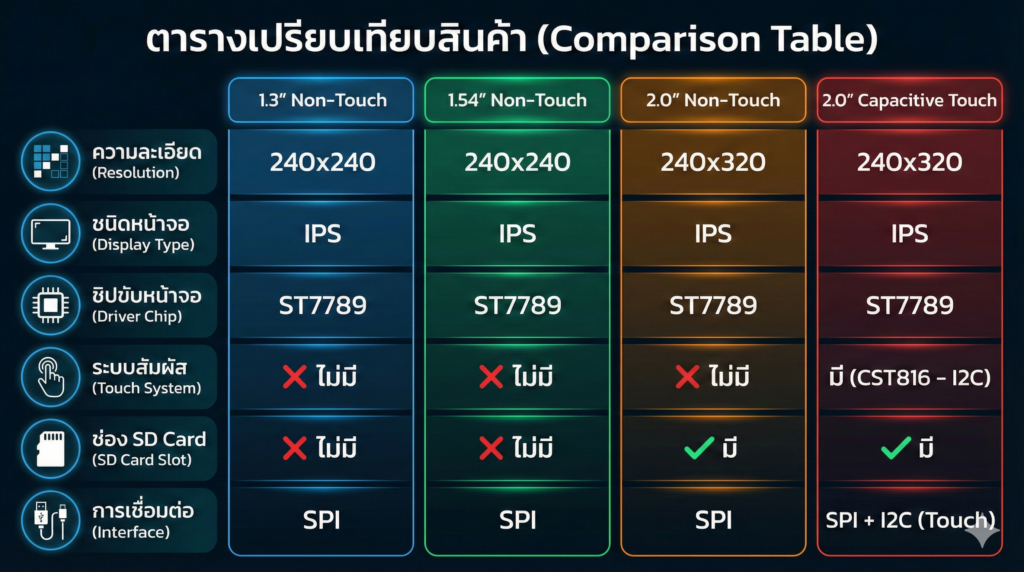
เปรียบเทียบ (Comparison)
ในรุ่นขนาด 1.3″ และ 1.54″ จะเน้นความกะทัดรัด เหมาะสำหรับอุปกรณ์สวมใส่หรืออุปกรณ์แสดงผลสถานะขนาดเล็ก ส่วนรุ่น 2.0″ จะมีความโดดเด่นในด้านพื้นที่การแสดงผลที่มากกว่า และถูกออกแบบมาเพื่อการใช้งานที่ซับซ้อนขึ้นด้วยการเพิ่มช่อง SD Card เข้ามา ทำให้สามารถเก็บไฟล์รูปภาพ .bmp เพื่อดึงมาแสดงผลบนหน้าจอได้โดยไม่เปลืองหน่วยความจำของตัวประมวลผลหลัก สำหรับรุ่น Capacitive Touch จะให้ประสบการณ์การใช้งานเหมือนสมาร์ทโฟน เหมาะสำหรับเครื่องมือวัดหรือแผงควบคุมที่ต้องการการโต้ตอบจากผู้ใช้งาน
ตัวอย่างการใช้งาน (Applications)
Smart Watch DIY: สร้างนาฬิกาอัจฉริยะที่แสดงผลแจ้งเตือนและวัดอัตราการเต้นของหัวใจ
IoT Dashboard: แสดงค่าอุณหภูมิ ความชื้น และกราฟสถานะของระบบ Smart Home
Media Player: ใช้รุ่น 2.0″ แสดงภาพถ่ายจาก SD Card หรือสร้างเครื่องเล่น MP3 ขนาดเล็ก
Control Panel: รุ่น Touch Screen ใช้ทำหน้าจอควบคุมเครื่องจักรหรือระบบสั่งการในโรงงาน
Educational Kits: ใช้เป็นอุปกรณ์เสริมสำหรับการเรียนรู้การเขียนโปรแกรมกราฟิกบนไมโครคอนโทรลเลอร์
ตัวอย่างโปรแกรม (Example Arduino Code)
การตั้งค่าและติดตั้งโปรแกรม Setup Arduino Library
- TFT_eSPI
- PNGdec
- JPEGDecoder
- TJpg_Decoder
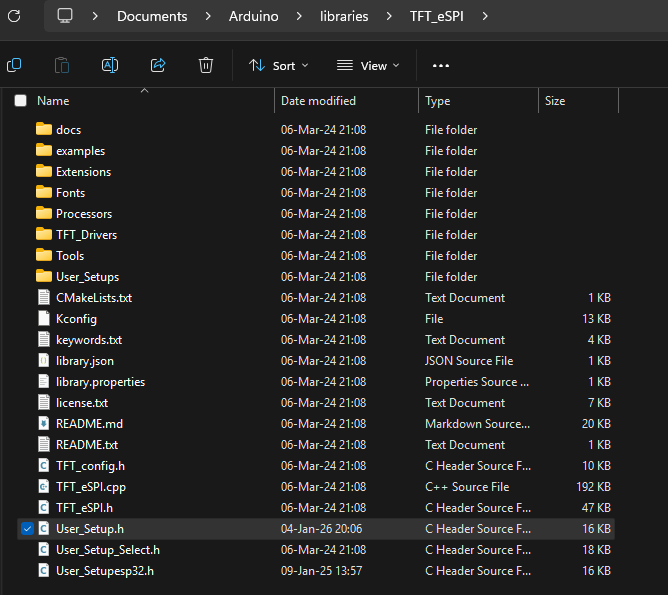
ใช้ไลบรารี TFT_eSPI สำหรับควบคุมจอ ST7789
ไลบรารีนี้ต้องตั้งค่าขา GPIO ในไฟล์
User_Setup.hให้ตรงกับบอร์ดก่อนใช้งาน
การใช้งานหน้าจอ TFT LCD 1.3″ 1.54″ 2.0″ สามารถใช้โปรแกรมเดียวกันได้ เนื่องจาก Driver ST7789 เหมือนกัน ทำให้ง่ายต่อการใช้งาน
ตัวอย่างที่ 1 การแสดงผลกราฟิก UI หน้าจอ 1.3" หรือ 1.54" TFT LCD 240x240 Pixel Driver ST7789
1_TFT_LCD_ST7789_Demo
อุปกรณ์ที่ใช้ในโปรเจกต์
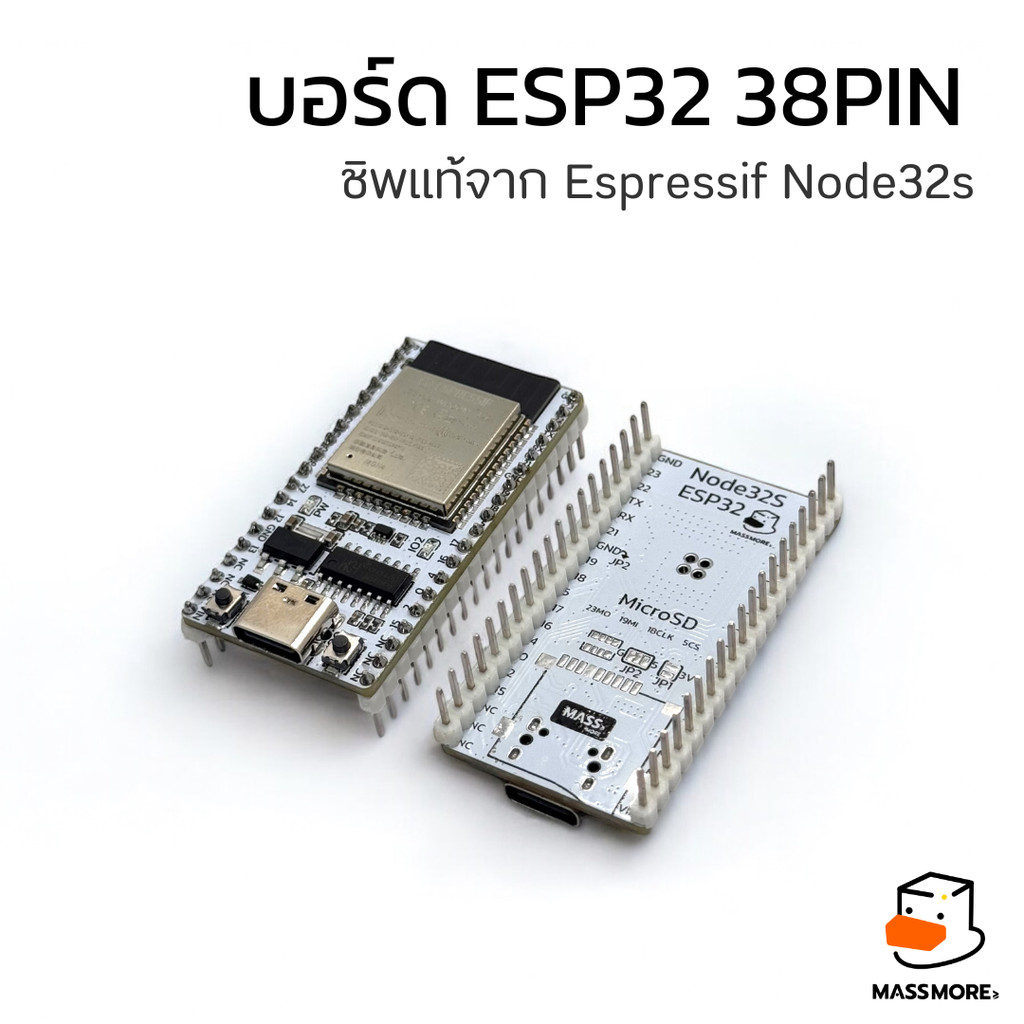
บอร์ด ESP32 38PIN Massmore
TFT LCD 1.3″ 1.54″ 2.0″ (รุ่นใดก็ได้)
Arduino IDE Code
- อย่าลืมติดตั้ง Library จากไฟล์บน Github
https://github.com/Massmore/SKU-1021-TFT-LCD-ST7789
					#include <SPI.h>
#include <TFT_eSPI.h>

TFT_eSPI tft = TFT_eSPI();

// --- Color Definitions ---
#define MASSMORE_BLUE   0x041F
#define MASSMORE_PINK   0xF81F
#define MASSMORE_CYAN   0x07FF
#define NEON_GREEN      0x07E0
#define DARK_BG         0x10A2 // Dark Grey
#define ORANGE_RED      0xFA20
#define PURPLE_Haze     0x780F

// --- Global Variables ---
int currentPage = 1;
unsigned long lastPageSwitchTime = 0;
const unsigned long pageDuration = 5000; // 5000ms = 5 วินาที
bool pageInitialized = false; // ตัวแปรเช็กว่าวาด Background หรือยัง

// ตัวแปรสำหรับ Animation หน้า 1
int p1_circleR = 5;
int p1_grow = 1;

// ตัวแปรสำหรับ Animation หน้า 2 (Bouncing Ball)
int p2_ballX = 120, p2_ballY = 120;
int p2_dirX = 3, p2_dirY = 3;
int p2_radius = 8;

// ตัวแปรสำหรับ Animation หน้า 3 (Radar Pulse)
int p3_pulseR = 10;

void setup() {
  tft.begin();
  tft.setRotation(0);
  tft.fillScreen(TFT_BLACK);
  lastPageSwitchTime = millis();
}

void loop() {
  unsigned long currentTime = millis();

  // ตรวจสอบว่าถึงเวลาเปลี่ยนหน้าหรือยัง
  if (currentTime - lastPageSwitchTime > pageDuration) {
    currentPage++;
    if (currentPage > 3) currentPage = 1; // วนกลับไปหน้า 1
    lastPageSwitchTime = currentTime;
    pageInitialized = false; // บอกให้วาด Background ใหม่
    tft.fillScreen(TFT_BLACK); // ล้างหน้าจอ
  }

  // เลือกทำงานตามหน้าปัจจุบัน
  switch (currentPage) {
    case 1:
      if (!pageInitialized) drawPage1_Static();
      runPage1_Anim();
      break;
    case 2:
      if (!pageInitialized) drawPage2_Static();
      runPage2_Anim();
      break;
    case 3:
      if (!pageInitialized) drawPage3_Static();
      runPage3_Anim();
      break;
  }

  delay(30); // หน่วงนิดหน่อยเพื่อความลื่นไหล (30-50ms)
}

// ==========================================
// PAGE 1: "Hello Worlds" (ธีมสีฟ้า/ชมพู)
// ==========================================
void drawPage1_Static() {
  tft.fillScreen(TFT_BLACK);
  // กรอบ Card
  tft.drawRoundRect(10, 10, 220, 220, 10, MASSMORE_CYAN);
  tft.drawRoundRect(12, 12, 216, 216, 9, MASSMORE_BLUE);
  // Header
  tft.fillRoundRect(20, 30, 200, 40, 5, MASSMORE_BLUE);

  tft.setTextColor(TFT_WHITE, MASSMORE_BLUE);
  tft.setTextDatum(MC_DATUM);
  tft.setTextSize(2);
  tft.drawString("Hello Worlds", 120, 50);

  tft.setTextColor(TFT_YELLOW, TFT_BLACK);
  tft.setTextSize(1);
  tft.setTextFont(4);
  tft.drawString("We are", 120, 130);

  tft.setTextColor(MASSMORE_CYAN, TFT_BLACK);
  tft.drawString("Massmore", 120, 160);

  pageInitialized = true;
}

void runPage1_Anim() {
  // Animation: วงกลมหายใจ (Breathing Circle)
  tft.drawCircle(120, 200, p1_circleR, TFT_BLACK); // ลบวงเก่า

  if (p1_grow) {
    p1_circleR++;
    if (p1_circleR > 18) p1_grow = 0;
  } else {
    p1_circleR--;
    if (p1_circleR < 5) p1_grow = 1;
  }
  tft.drawCircle(120, 200, p1_circleR, MASSMORE_PINK); // วาดวงใหม่
}

// ==========================================
// PAGE 2: "System Ready" (ธีมสีเขียว/Cyber)
// ==========================================
void drawPage2_Static() {
  tft.fillScreen(DARK_BG);
  // เส้นตาราง Grid แบบ Cyber
  for(int i=0; i<240; i+=40) {
    tft.drawFastHLine(0, i, 240, 0x2124); // เส้นแนวนอนสีเทาเข้ม
    tft.drawFastVLine(i, 0, 240, 0x2124); // เส้นแนวตั้ง
  }

  // กล่องข้อความตรงกลาง
  tft.fillRect(40, 90, 160, 60, TFT_BLACK);
  tft.drawRect(40, 90, 160, 60, NEON_GREEN);

  tft.setTextColor(NEON_GREEN, TFT_BLACK);
  tft.setTextDatum(MC_DATUM);
  tft.setTextFont(4);
  tft.setTextSize(1);
  tft.drawString("SYSTEM", 120, 110);
  tft.drawString("READY...", 120, 135);

  pageInitialized = true;
}

void runPage2_Anim() {
  // Animation: ลูกบอลเด้งดึ๋ง (Bouncing Ball)

  // 1. ลบลูกบอลเก่า (ใช้สีพื้นหลังทับ)
  // เนื่องจากพื้นหลังมี Grid การลบอาจจะทำให้เส้นหาย (เขียนทับด้วยสีพื้น)
  // แต่เพื่อความง่าย เราจะทับด้วยสีพื้น Dark BG ไปเลย
  tft.fillCircle(p2_ballX, p2_ballY, p2_radius, DARK_BG);

  // 2. คำนวณตำแหน่งใหม่
  p2_ballX += p2_dirX;
  p2_ballY += p2_dirY;

  // 3. เช็กการชนขอบ (Bounce)
  if (p2_ballX > 230 || p2_ballX < 10) p2_dirX *= -1;
  if (p2_ballY > 230 || p2_ballY < 10) p2_dirY *= -1;

  // 4. วาดลูกบอลใหม่
  tft.fillCircle(p2_ballX, p2_ballY, p2_radius, ORANGE_RED);
}

// ==========================================
// PAGE 3: "Processing" (ธีมสีม่วง/ส้ม)
// ==========================================
void drawPage3_Static() {
  tft.fillScreen(TFT_BLACK);

  // วาดวงแหวนรอบนอก
  tft.drawCircle(120, 120, 110, PURPLE_Haze);
  tft.drawCircle(120, 120, 100, PURPLE_Haze);

  tft.setTextColor(TFT_WHITE, TFT_BLACK);
  tft.setTextDatum(MC_DATUM);
  tft.setTextFont(2);
  tft.setTextSize(2);
  tft.drawString("ESP32 Demo", 120, 30);

  tft.setTextColor(ORANGE_RED, TFT_BLACK);
  tft.setTextFont(4);
  tft.setTextSize(1);
  tft.drawString("Processing", 120, 210);

  pageInitialized = true;
}

void runPage3_Anim() {
  // Animation: เรดาร์กระจายออก (Pulse Radar) ตรงกลางจอ

  // ลบวงเก่า
  tft.drawCircle(120, 120, p3_pulseR, TFT_BLACK);
  tft.drawCircle(120, 120, p3_pulseR - 1, TFT_BLACK); // ลบเส้นหนาหน่อย

  // ขยายขนาด
  p3_pulseR += 2;

  // ถ้าใหญ่เกินกรอบ ให้เริ่มใหม่จากตรงกลาง
  if (p3_pulseR > 80) p3_pulseR = 10;

  // วาดวงใหม่ (เปลี่ยนสีตามขนาดได้ถ้าต้องการ)
  tft.drawCircle(120, 120, p3_pulseR, 0xFFE0); // สีเหลือง
  tft.drawCircle(120, 120, p3_pulseR - 1, 0xFFE0);
}
ตัวอย่างที่ 2 การแสดงผลกราฟิกแบบ DMA (Direct Memory Access) UI หน้าจอ 1.3" หรือ 1.54" TFT LCD 240x240 Pixel Driver ST7789
2_TFT_LCD_ST7789_DM
อุปกรณ์ที่ใช้ในโปรเจกต์
บอร์ด ESP32 38PIN Massmore
TFT LCD 1.3″ 1.54″ 2.0″ (รุ่นใดก็ได้)
Arduino IDE Code
- อย่าลืมติดตั้ง Library จากไฟล์บน Github
https://github.com/Massmore/SKU-1021-TFT-LCD-ST7789
					// Created by Bodmer 20/04/2021 as an example for:
// https://github.com/Bodmer/TFT_eSPI

// Number of circles to draw
#define CNUMBER 42

// Define the width and height according to the TFT and the
// available memory. The sprites will require:
//     DWIDTH * DHEIGHT * 2 bytes of RAM
// Note: for a 240 * 320 area this is 150 Kbytes!
#define DWIDTH  240
#define DHEIGHT 240

#include <TFT_eSPI.h>

// Library instance
TFT_eSPI    tft = TFT_eSPI();

// Create two sprites for a DMA toggle buffer
TFT_eSprite spr[2] = {TFT_eSprite(&tft), TFT_eSprite(&tft)};

// Pointers to start of Sprites in RAM (these are then "image" pointers)
uint16_t* sprPtr[2];

// Used for fps measuring
uint16_t counter = 0;
int32_t startMillis = millis();
uint16_t interval = 100;
String fps = "xx.xx fps";

// Structure to hold circle plotting parameters
typedef struct circle_t {
  int16_t   cx[CNUMBER] = { 0 }; // x coordinate of centre
  int16_t   cy[CNUMBER] = { 0 }; // y coordinate of centre
  int16_t   cr[CNUMBER] = { 0 }; // radius
  uint16_t col[CNUMBER] = { 0 }; // colour
  int16_t   dx[CNUMBER] = { 0 }; // x movement & direction
  int16_t   dy[CNUMBER] = { 0 }; // y movement & direction
} circle_param;

// Create the structure and get a pointer to it
circle_t *circle = new circle_param;

// #########################################################################
// Setup
// #########################################################################
void setup() {
  Serial.begin(115200);

  tft.init();
  tft.initDMA();
  tft.fillScreen(TFT_BLACK);

  // Create the 2 sprites, each is half the size of the screen
  sprPtr[0] = (uint16_t*)spr[0].createSprite(DWIDTH, DHEIGHT / 2);
  sprPtr[1] = (uint16_t*)spr[1].createSprite(DWIDTH, DHEIGHT / 2);

  // Move the sprite 1 coordinate datum upwards half the screen height
  // so from coordinate point of view it occupies the bottom of screen
  spr[1].setViewport(0, -DHEIGHT / 2, DWIDTH, DHEIGHT);

  // Define text datum for each Sprite
  spr[0].setTextDatum(MC_DATUM);
  spr[1].setTextDatum(MC_DATUM);

  // Seed the random number generator
  randomSeed(analogRead(A0));

  // Initialise circle parameters
  for (uint16_t i = 0; i < CNUMBER; i++) {
    circle->cr[i] = random(12, 24);
    circle->cx[i] = random(circle->cr[i], DWIDTH - circle->cr[i]);
    circle->cy[i] = random(circle->cr[i], DHEIGHT - circle->cr[i]);

    circle->col[i] = rainbow(4 * i);
    circle->dx[i] = random(1, 5);
    if (random(2)) circle->dx[i] = -circle->dx[i];
    circle->dy[i] = random(1, 5);
    if (random(2)) circle->dy[i] = -circle->dy[i];
  }

  tft.startWrite(); // TFT chip select held low permanently

  startMillis = millis();
}

// #########################################################################
// Loop
// #########################################################################
void loop() {
  drawUpdate(0); // Update top half
  drawUpdate(1); // Update bottom half

  // Calculate the fps every <interval> iterations.
  counter++;
  if (counter % interval == 0) {
    long millisSinceUpdate = millis() - startMillis;
    fps = String((interval * 1000.0 / (millisSinceUpdate))) + " fps";
    Serial.println(fps);
    startMillis = millis();
  }
}

// #########################################################################
// Render circles to sprite 0 or 1 and initiate DMA
// #########################################################################
void drawUpdate (bool sel) {
  spr[sel].fillSprite(TFT_BLACK);
  for (uint16_t i = 0; i < CNUMBER; i++) {
    // Draw (Note sprite 1 datum was moved, so coordinates do not need to be adjusted
    spr[sel].fillCircle(circle->cx[i], circle->cy[i], circle->cr[i], circle->col[i]);
    spr[sel].drawCircle(circle->cx[i], circle->cy[i], circle->cr[i], TFT_WHITE);
    spr[sel].setTextColor(TFT_BLACK, circle->col[i]);
    spr[sel].drawNumber(i + 1, 1 + circle->cx[i], circle->cy[i], 2);
  }

  tft.pushImageDMA(0, sel * DHEIGHT / 2, DWIDTH, DHEIGHT / 2, sprPtr[sel]);

  // Update circle positions after bottom half has been drawn
  if (sel) {
    for (uint16_t i = 0; i < CNUMBER; i++) {
      circle->cx[i] += circle->dx[i];
      circle->cy[i] += circle->dy[i];
      if (circle->cx[i] <= circle->cr[i]) {
        circle->cx[i] = circle->cr[i];
        circle->dx[i] = -circle->dx[i];
      }
      else if (circle->cx[i] + circle->cr[i] >= DWIDTH - 1) {
        circle->cx[i] = DWIDTH - circle->cr[i] - 1;
        circle->dx[i] = -circle->dx[i];
      }
      if (circle->cy[i] <= circle->cr[i]) {
        circle->cy[i] = circle->cr[i];
        circle->dy[i] = -circle->dy[i];
      }
      else if (circle->cy[i] + circle->cr[i] >= DHEIGHT - 1) {
        circle->cy[i] = DHEIGHT - circle->cr[i] - 1;
        circle->dy[i] = -circle->dy[i];
      }
    }
  }
}

// #########################################################################
// Return a 16-bit rainbow colour
// #########################################################################
uint16_t rainbow(byte value)
{
  // If 'value' is in the range 0-159 it is converted to a spectrum colour
  // from 0 = red through to 127 = blue to 159 = violet
  // Extending the range to 0-191 adds a further violet to red band

  value = value % 192;

  byte red   = 0; // Red is the top 5 bits of a 16-bit colour value
  byte green = 0; // Green is the middle 6 bits, but only top 5 bits used here
  byte blue  = 0; // Blue is the bottom 5 bits

  byte sector = value >> 5;
  byte amplit = value & 0x1F;

  switch (sector)
  {
    case 0:
      red   = 0x1F;
      green = amplit; // Green ramps up
      blue  = 0;
      break;
    case 1:
      red   = 0x1F - amplit; // Red ramps down
      green = 0x1F;
      blue  = 0;
      break;
    case 2:
      red   = 0;
      green = 0x1F;
      blue  = amplit; // Blue ramps up
      break;
    case 3:
      red   = 0;
      green = 0x1F - amplit; // Green ramps down
      blue  = 0x1F;
      break;
    case 4:
      red   = amplit; // Red ramps up
      green = 0;
      blue  = 0x1F;
      break;
    case 5:
      red   = 0x1F;
      green = 0;
      blue  = 0x1F - amplit; // Blue ramps down
      break;
  }

  return red << 11 | green << 6 | blue;
}
ตัวอย่างที่ 3 การแสดงผลกราฟิก UI หน้าจอ 2.0" TFT LCD 320x240 Pixel Driver ST7789
3_TFT_LCD_ST7789_PNG
อุปกรณ์ที่ใช้ในโปรเจกต์
บอร์ด ESP32 38PIN Massmore
TFT LCD 1.3″ 1.54″ 2.0″ (รุ่นใดก็ได้)
Arduino IDE Code
- อย่าลืมติดตั้ง Library จากไฟล์บน Github
https://github.com/Massmore/SKU-1021-TFT-LCD-ST7789
// This example renders a png file that is stored in a FLASH array
// using the PNGdec library (available via library manager).

// Image files can be converted to arrays using the tool here:
// https://notisrac.github.io/FileToCArray/
// To use this tool:
//   1. Drag and drop file on "Browse..." button
//   2. Tick box "Treat as binary"
//   3. Click "Convert"
//   4. Click "Save as file" and move the header file to sketch folder
//   5. Open the sketch in IDE
//   6. Include the header file containing the array (panda.h in this example)

// Include the PNG decoder library
#include <PNGdec.h>
#include "panda.h" // Image is stored here in an 8-bit array

PNG png; // PNG decoder instance

#define MAX_IMAGE_WIDTH 240 // Adjust for your images

int16_t xpos = 0;
int16_t ypos = 0;

// Include the TFT library https://github.com/Bodmer/TFT_eSPI
#include "SPI.h"
#include <TFT_eSPI.h>              // Hardware-specific library
TFT_eSPI tft = TFT_eSPI();         // Invoke custom library

//====================================================================================
//                                    Setup
//====================================================================================
void setup()
{
  Serial.begin(115200);
  Serial.println("\n\n Using the PNGdec library");

  // Initialise the TFT
  tft.begin();
  tft.fillScreen(TFT_BLACK);

  Serial.println("\r\nInitialisation done.");
}

//====================================================================================
//                                    Loop
//====================================================================================
void loop()
{
  int16_t rc = png.openFLASH((uint8_t *)panda, sizeof(panda), pngDraw);
  if (rc == PNG_SUCCESS) {
    Serial.println("Successfully opened png file");
    Serial.printf("image specs: (%d x %d), %d bpp, pixel type: %d\n", png.getWidth(), png.getHeight(), png.getBpp(), png.getPixelType());
    tft.startWrite();
    uint32_t dt = millis();
    rc = png.decode(NULL, 0);
    Serial.print(millis() - dt); Serial.println("ms");
    tft.endWrite();
    // png.close(); // not needed for memory->memory decode
  }
  delay(10000);
  tft.fillScreen(random(0x10000));
}


//=========================================v==========================================
//                                      pngDraw
//====================================================================================
// This next function will be called during decoding of the png file to
// render each image line to the TFT.  If you use a different TFT library
// you will need to adapt this function to suit.
// Callback function to draw pixels to the display
void pngDraw(PNGDRAW *pDraw) {
  uint16_t lineBuffer[MAX_IMAGE_WIDTH];
  png.getLineAsRGB565(pDraw, lineBuffer, PNG_RGB565_BIG_ENDIAN, 0xffffffff);
  tft.pushImage(xpos, ypos + pDraw->y, pDraw->iWidth, 1, lineBuffer);
}
ตัวอย่างที่ 4 การแสดงผลกราฟิก SD Card และ ทัชสกรีน หน้าจอ 2.0" TFT LCD 320x240 Pixel Driver ST7789
4-TFT_LCD_Touch_ESP32S3_Demo
อุปกรณ์ที่ใช้ในโปรเจกต์
บอร์ด ESP32 38PIN Massmore
TFT LCD 2.0″ (รุ่น Touch)
Arduino IDE Code
- อย่าลืมติดตั้ง Library จากไฟล์บน Github
https://github.com/Massmore/SKU-1021-TFT-LCD-ST7789
					#include "SD.h"
#include "SPI.h"
#include "cst816d.h"
#include <TFT_eSPI.h> // เรียกใช้ไลบรารีจอภาพ

// --- Config Pins (สำหรับ SD และ Touch) ---
#define SPI_MISO 13
#define SPI_MOSI 11
#define SPI_SCLK 12
#define SD_CS 0

#define TP_INT -1
#define TP_RST -1
#define TP_SDA 14
#define TP_SCL 15

// สร้างตัวแปร Hardware
SPIClass fspi(FSPI);
TFT_eSPI tft = TFT_eSPI(); // เรียกใช้ Object ของจอ

// ตัวแปร Global สำหรับรับส่งข้อมูลระหว่าง Task
volatile int shared_x = 0;
volatile int shared_y = 0;
volatile bool isTouched = false;
volatile bool updateScreen = false;

uint64_t cardSize;
toucht_coords_t toucht_coords;
uint16_t sd_count = 0;

// สร้าง Task Handle
TaskHandle_t Task1;

// --- ฟังก์ชันสำหรับ Task จอภาพ (รันบน Core 1) ---
void TaskDisplayCode(void * pvParameters) {
  // 1. Setup จอภาพ (ทำครั้งเดียว)
  tft.init();
  tft.setRotation(3); // แนวนอน
  tft.fillScreen(TFT_BLACK);

  // วาด UI พื้นฐาน
  tft.setTextColor(TFT_WHITE, TFT_BLACK);
  tft.setTextSize(2);
  tft.drawString("SD & Touch Test", 10, 10);

  tft.drawRect(5, 40, 310, 190, TFT_BLUE); // กรอบพื้นที่วาด

  // Loop ของ Task นี้ (ทำงานตลอดเวลาเหมือน void loop)
  for(;;) {
    if (updateScreen) {
      // แสดงพิกัดเป็นตัวเลข
      tft.setTextColor(TFT_CYAN, TFT_BLACK);
      tft.setTextSize(2);
      String coords = "X: " + String(shared_x) + "  Y: " + String(shared_y) + "   ";
      tft.drawString(coords, 20, 200);

      // วาดจุดที่ตำแหน่ง Touch
      // แปลงพิกัด (Map) ถ้าจำเป็น หรือใช้ค่าตรงๆ
      if (shared_x > 0 && shared_y > 0) {
          tft.fillCircle(shared_x, shared_y, 5, TFT_RED);
      }

      updateScreen = false; // เคลียร์สถานะเมื่อวาดเสร็จ
    }

    // หน่วงเวลาเล็กน้อยเพื่อให้ Watchdog ทำงานและไม่กิน CPU 100%
    vTaskDelay(10 / portTICK_PERIOD_MS);
  }
}

void setup() {
  Serial.begin(115200);
  Serial.println("ESP32 Multi-Tasking: SD + Touch + TFT");

  // 1. เริ่มต้น Hardware อื่นๆ
  touch_init(TP_SDA, TP_SCL, TP_RST, TP_INT);

  fspi.begin(SPI_SCLK, SPI_MISO, SPI_MOSI, -1);
  if (!SD.begin(SD_CS, fspi)) {
    Serial.println("Card Mount Failed");
  } else {
    cardSize = SD.cardSize() / (1024 * 1024);
    Serial.printf("SD Card Size: %lluMB\n", cardSize);
  }

  // 2. สร้าง Task สำหรับจอภาพ
  // xTaskCreatePinnedToCore(ฟังก์ชัน, "ชื่อ", StackSize, Parameter, Priority, Handle, CoreID)
  xTaskCreatePinnedToCore(
                    TaskDisplayCode,   /* ฟังก์ชันที่ทำงาน */
                    "DisplayTask",     /* ชื่อ Task */
                    10000,             /* ขนาด Stack (10k น่าจะพอ) */
                    NULL,              /* พารามิเตอร์ */
                    1,                 /* Priority (1 = ปกติ) */
                    &Task1,            /* Task Handle */
                    1);                /* **Core ID** (0 หรือ 1) */

  // หมายเหตุ: โดยปกติ Arduino loop() ก็รันบน Core 1
  // การแยก Task นี้จะช่วยให้เราเขียนโค้ดแยกส่วนกันได้ชัดเจน
}
void loop() {
  // 1. อ่านค่า Touch
  if (get_touch_coords(&toucht_coords))
  {
    // --- ส่วนคำนวณ Map ตำแหน่ง (สำคัญ) ---

    // แปลงค่า Y ของ Touch (300-0) ไปเป็น X ของจอ (0-320)
    int draw_x = map(toucht_coords.y, 300, 0, 0, 320);

    // แปลงค่า X ของ Touch (200-0) ไปเป็น Y ของจอ (0-240)
    int draw_y = map(toucht_coords.x, 200, 0, 0, 240);

    // ป้องกันค่าเกินขอบจอ (Constrain)
    if (draw_x < 0) draw_x = 0;
    if (draw_x > 320) draw_x = 320;
    if (draw_y < 0) draw_y = 0;
    if (draw_y > 240) draw_y = 240;

    // --- ส่วนแสดงผล ---

    // Debug ดูค่าที่แปลงแล้ว
    Serial.print("Raw[x,y]: ");
    Serial.print(toucht_coords.x); Serial.print(","); Serial.print(toucht_coords.y);
    Serial.print("  ->  Screen[x,y]: ");
    Serial.print(draw_x); Serial.print(","); Serial.println(draw_y);

    // วาดจุดลงบนจอ (สีเขียว)
    tft.fillCircle(draw_x, draw_y, 4, TFT_GREEN);
  }

  // (ส่วนจัดการ SD Card คงเดิม...)
  if (sd_count++ > 200) {
    sd_count = 0;
    // tft.fillScreen(TFT_BLACK); // ถ้าอยากเคลียร์หน้าจอให้เปิดบรรทัดนี้
  }
  delay(10);
}